您現(xiàn)在的位置是:首頁 >技術(shù)交流 >python3 selenium3 使用Chrome的無頭瀏覽器 截取網(wǎng)頁全屏圖片網(wǎng)站首頁技術(shù)交流
python3 selenium3 使用Chrome的無頭瀏覽器 截取網(wǎng)頁全屏圖片
前言
selenium是一個模擬瀏覽器的自動化執(zhí)行框架,但是如果每次執(zhí)行都要打開瀏覽器來處理任務(wù)的話,效率上都不高。最重要的是如果安裝在Centos8服務(wù)器環(huán)境下,打開瀏覽器來模擬操作是更加不合適的,尤其是碰上需要截取網(wǎng)頁圖片這樣的需求。
這時候就要考慮使用Chrome的無頭瀏覽器模式了。所謂的無頭瀏覽器模式也就是不需要打開瀏覽器,但是卻可以起到模擬打開瀏覽器的執(zhí)行效果,一切無界面執(zhí)行。
下面來看看如果安裝部署到執(zhí)行。
1.安裝chrome
1.1 添加google的repo源
vim /etc/yum.repos.d/google.repo
在打開的空文件中填入以下內(nèi)容
[google]
name=Google-x86_64
baseurl=http://dl.google.com/linux/rpm/stable/x86_64
enabled=1
gpgcheck=0
gpgkey=https://dl-ssl.google.com/linux/linux_signing_key.pub
[google-chrome]
name=google-chrome
baseurl=http://dl.google.com/linux/chrome/rpm/stable/$basearch
enabled=1
gpgcheck=0
gpgkey=https://dl-ssl.google.com/linux/linux_signing_key.pub
1.2 使用yum安裝chrome瀏覽器(不是root用戶前面加sudo)
yum makecache
sudo yum install google-chrome-stable -y
sudo yum install google-chrome-stable -y
上面則是centos安裝谷歌瀏覽器,下面則安裝debian的安裝谷歌瀏覽器教程
1.安裝chrome
wget https://dl.google.com/linux/direct/google-chrome-stable_current_amd64.deb
sudo apt-get -f install
dpkg -i google-chrome-stable_current_amd64.deb
1.1如果提示錯誤:dpkg: error processing package google-chrome-stable (--install): 之后執(zhí)行以下命令
sudo apt-get upgrade
sudo apt-get update
sudo apt-get -f install
dpkg -i google-chrome-stable_current_amd64.deb
經(jīng)過以上步驟,谷歌瀏覽器就安裝完成了,接下來安裝驅(qū)動
2.安裝chromedriver驅(qū)動
2.1 查看chrome的版本
安裝成功之后,查看安裝的chrom版本如下
[root@locust03 ~]# google-chrome --version
Google Chrome 96.0.4664.45
[root@locust03 ~]#
2.2 下載chromedriver
****selenium如果想要執(zhí)行chrome瀏覽器的話,是需要安裝驅(qū)動chromedriver的,而下載chromedriver可以從兩個地方去下載, 點擊訪問如下:
點擊訪問官網(wǎng) 點位訪問國內(nèi)淘寶鏡像地址 那么其實一般都是訪問國內(nèi)的鏡像地址,如下:****
點擊訪問官網(wǎng) 點位訪問國內(nèi)淘寶鏡像地址 
找到與自己相對應(yīng)的最新版本,進行下載 因為我準(zhǔn)備安裝在Centos8服務(wù)器上,所以選擇linux64位的版本。
wget http://npm.taobao.org/mirrors/chromedriver//96.0.4664.45/chromedriver_linux64.zip
wget http://npm.taobao.org/mirrors/chromedriver//98.0.4758.102/chromedriver_linux64.zip
2.3 添加至環(huán)境變量$PATH
# 1.進入opt目錄
[root@server opt]# cd /opt/
# 2.下載chromdirver
[root@server opt]# wget http://npm.taobao.org/mirrors/chromedriver/78.0.3904.105/chromedriver_linux64.zip
# 3.解壓zip包
[root@server opt]# unzip chromedriver_linux64.zip
# 4.得到一個二進制可執(zhí)行文件
[root@server opt]# ls -ll chromedriver
-rwxrwxr-x 1 root root 11610824 Nov 19 02:20 chromedriver
# 5. 創(chuàng)建存放驅(qū)動的文件夾driver
[root@server opt]# mkdir -p /opt/driver/bin
# 6.將chromedirver放入文件夾driver中bin下
[root@server opt]# mv chromedriver /opt/driver/bin/
配置環(huán)境變量如下:
[root@server driver]# vim /etc/profile
...
# 添加內(nèi)容
export DRIVER=/opt/driver
export PATH=$PATH:$DRIVER/bin
設(shè)置環(huán)境變量立即生效,并執(zhí)行全局命令查看chromedirver版本:
[root@server ~]# source /etc/profile
[root@server ~]#
[root@server ~]# chromedriver --version
ChromeDriver 78.0.3904.105 (60e2d8774a8151efa6a00b1f358371b1e0e07ee2-refs/branch-heads/3904@{#877})
[root@server ~]#
能全局執(zhí)行chromedriver說明環(huán)境配置生效了。
3. 安裝selenium
selenium可以在你項目的虛擬環(huán)境中簡單地用pip安裝
pip3 install selenium
[root@server selenium_ex]# pip3 install selenium
Looking in indexes: http://mirrors.tencentyun.com/pypi/simple
Collecting selenium
  Downloading http://mirrors.tencentyun.com/pypi/packages/80/d6/4294f0b4bce4de0abf13e17190289f9d0613b0a44e5dd6a7f5ca98459853/selenium-3.141.0-py2.py3-none-any.whl (904kB)
     |████████████████████████████████| 911kB 990kB/s
Requirement already satisfied: urllib3 in /usr/local/python3/lib/python3.7/site-packages (from selenium) (1.25.6)
Installing collected packages: selenium
Successfully installed selenium-3.141.0
[root@locust03 selenium_ex]#
4. 腳本測試
編寫一個test.py的腳本,如下:
from selenium.webdriver import Chrome
from selenium.webdriver.chrome.options import Options
import time
import os.path

# 配置驅(qū)動路徑
DRIVER_PATH = '/opt/driver/bin/chromedriver'

if __name__ == "__main__":
    # 設(shè)置瀏覽器
    options = Options()
    options.add_argument('--no-sandbox')
    options.add_argument('--headless')  # 無頭參數(shù)
    options.add_argument('--disable-gpu')
    # 啟動瀏覽器
    driver = Chrome(executable_path=DRIVER_PATH, options=options)
    driver.maximize_window()

    try:
        # 訪問頁面
        url = 'https://www.jianshu.com/u/a94f887f8776'
        driver.get(url)
        time.sleep(1)

        # 設(shè)置截屏整個網(wǎng)頁的寬度以及高度
        scroll_width = 1600
        scroll_height = 1500
        driver.set_window_size(scroll_width, scroll_height)

        # 保存圖片
        img_path = os.getcwd()
        img_name = time.strftime('%Y-%m-%d-%H-%M-%S', time.localtime(time.time()))
        img = "%s.png" % os.path.join(img_path, img_name)
        driver.get_screenshot_as_file(img)

        # 關(guān)閉瀏覽器
        driver.close()
        driver.quit()

    except Exception as e:
        print(e)
在服務(wù)器上執(zhí)行如下:
[root@server selenium_ex]# python3 test.py
[root@server selenium_ex]#
[root@server selenium_ex]# ls
2019-11-28-15-06-48.png  test.py
[root@server selenium_ex]#
將圖片下載查看一下,如下: 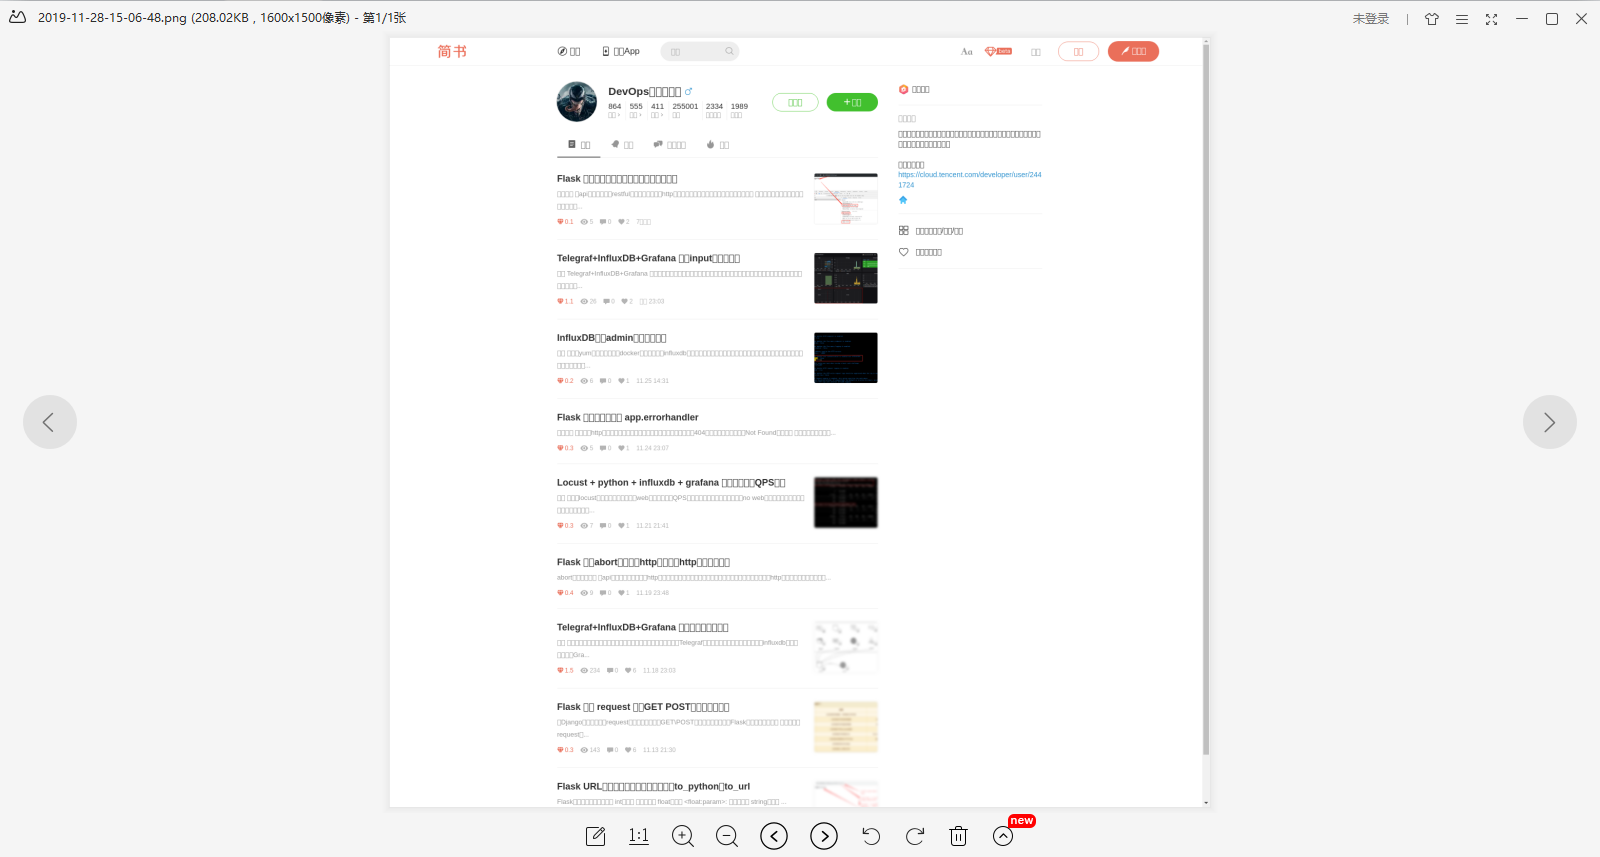
可以看到已經(jīng)能夠正常模擬瀏覽器登陸,并且截取網(wǎng)頁的圖片下來。可以從圖片中看到,凡是中文的地方都是顯示方框的符號,這是因為Centos8默認(rèn)下是沒有安裝中文字體的,所以chrom瀏覽器打開就無法正常顯示中文。
linux使用——CentOS8安裝中文字體 背景
項目開發(fā)中,給照片添加水印時,發(fā)現(xiàn)添加的字體顯示為“口口口口口口”,上網(wǎng)尋找答案,發(fā)現(xiàn)是系統(tǒng)部署的Linux服務(wù)器不支持水印中的中文字體。
解決方法
**服務(wù)器Linux系統(tǒng)中導(dǎo)入中文字體
系統(tǒng)環(huán)境**
**CentOS8
步驟**
使用root用戶登錄系統(tǒng) 查看已經(jīng)安裝的中文字體:fc-list :lang=zh
 創(chuàng)建中文字體目錄并分配權(quán)限
創(chuàng)建目錄:
mkdir /usr/share/fonts/chinese
分配權(quán)限:
chmod -R 777 /usr/share/fonts/chinese
備注:CentOS字體所在目錄為 /usr/share/fonts下
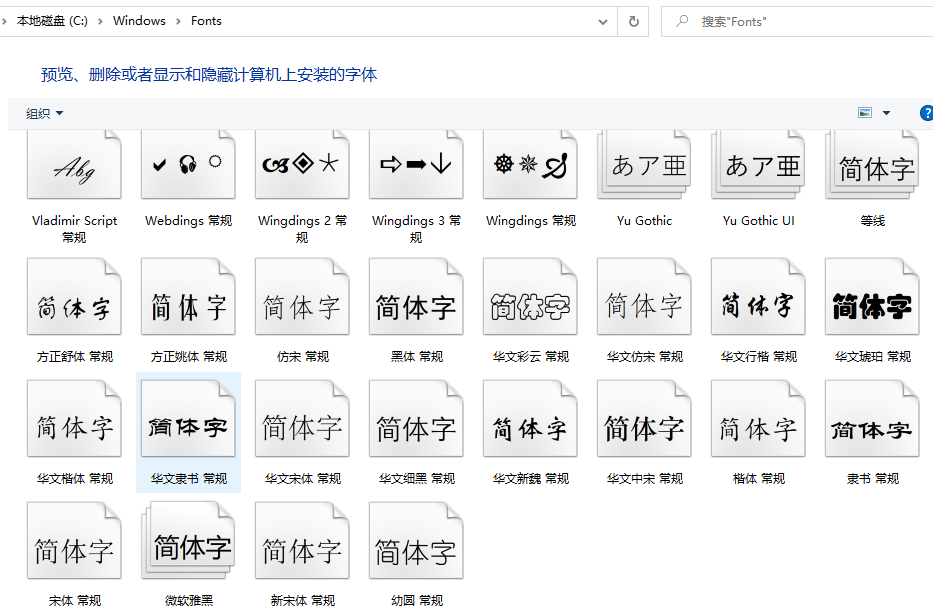
從windows系統(tǒng)上查找所需要的中文字體 
導(dǎo)入到/usr/share/fonts/chinese目錄下
windows字體目錄存在C:WindowsFonts下,字體文件一般都是.TTF .TTC 后綴 修改Linux字體配置文件
編輯字體配置文件:vim /etc/fonts/fonts.conf
增加中文字體目錄,如下圖:
<dir>/usr/share/fonts/chinese</dir>
刷新緩存:fc-cache 如果fc-cache失效,重啟下系統(tǒng)


站長推薦
- Redis緩存雪崩、穿透、雙寫一致
隨著系統(tǒng)訪問量的提高,復(fù)雜度的提升,響應(yīng)性能成為一個重點的關(guān)注點。而緩存的使用成為一個重點。...
- 用Redis實現(xiàn)“附近的人”功能
 針對“附近的人”這一位置服務(wù)領(lǐng)域的應(yīng)用場景,常見的可使用PG、MySQL和MongoDB等多種DB的空間索引進行實...
 - 七牛云認(rèn)證鑒黃并進行文件的上傳
 最近項目有用到七牛云存儲,需要對上傳的照片進行鑒黃并上傳報存
 - Redis中String常用命令
 string是最簡單的類型,一個Key對應(yīng)一個value,string類型是二進制安全的,redis的string可以包含任何數(shù)據(jù)...